Installing and Configuring Java in Windows XP or 7
 |
| JAVA |
Java can be downloaded from the website Download Java . This is a software intended for Java Developers, who want to write the programs and compile them and execute them.
For those, who just want to run the java programs on their systems, they need to download just the simplified version called the JRE (Java Runtime Environment),which can be downloaded from here : Download JRE.
Before downloading the software, one should verify whether they are downloading for their Operating system or not.
Installation of JDK :
- Double Click (or) Run the executable file, you have downloaded.
- It will open an installation wizard, starting the installation process
- Simply, you can continue to click "Next" button to finish the installation without any customizations.
- But, if you want to customize the installation, look and proceed with the installation process.
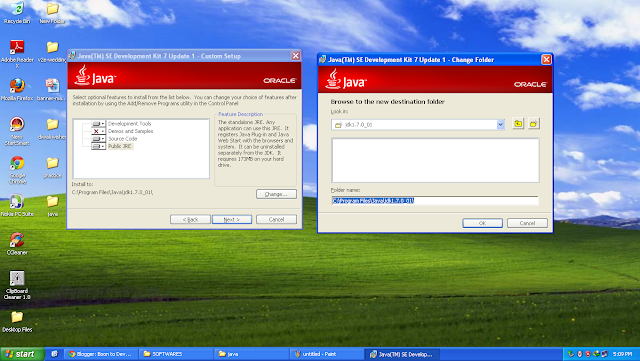
- The following images will provide you with a clear idea on installing java step by step.
 |
| JDK Installation Start Wizard |
 |
| Select which Components to install |
 |
| Choose Location where to install JDK |
 |
| JDK Installation Progress or Status |
 |
| Specify Location where to install JRE |
 |
| JRE Installation Progress |
 |
| Java Installation Finished |
Now, the Installation of Java is Finished.
Configuration :
Now, you can compile and execute Java Source Files, only after placing them in JDK Installed Directory\bin Location.
For Eg : C:\java\bin
But it is not possible and recommended to place all the source files in the installation directory to compile and execute the java programs.
In order to compile and execute from any location, we add the Path Location, where the Java Compilers and Interprets are present to the "Path" Environment Variable of the Operating System.
This process is explained below :
Note : All the steps are similar for both Windows XP and Windows 7 except in the place, where mentioned
 |
| Right Click on My Computer Icon |
 |
| Select Properties from the Popup Menu |
 |
| Windows 7 users click on "Advanced System Settings" |
 |
| Windows XP Users, Click on Advanced Tab |
 |
| Click on Environment Variables Button |
 |
| Observe the two Panels with titles "User Variables" and "System Variables" |
 |
| Select Path Variable from System Variables and Click on "Edit" button |
 |
| Go to the Directory where Java is installed and Copy the Path Location as shown above |
 |
| Go to the end of "Path" Environment Variable Value.Insert Semicolon and then paste the Path Location Copied in the previous Step and Click Ok. |
Now Verifying whether the compiler and interpreter tools are accessible outside the installation directory.
 |
| Open Command Prompt and Type "javac -version" without including quotations and press Enter |
 |
| If you see the output like this, then adding Compiler and Interpereter Tools to Path Environment Variable is successful and the Java Compiler is working. |
 |
| Open Command Prompt and Type "java -version" without including quotations and press Enter |
 |
| If you see the output like this, then adding Compiler and Interpereter Tools to Path Environment Variable is successful and the Java Interpreter is working |
Configuration of Java is Completed
Hope this tutorial is useful. Thank you for reading my tutorials. Please Share the tutorials on this blog
No comments:
Post a Comment